h58fg4↑↑↑Black Hat SEO backlinks, focusing on Black Hat SEO, Google Raking
FREE MONEY | FREE MONEY ONLINE | GET FREE MONEY NOW | Telegram: @seo7878 H2JpP↑↑↑Hack Tutorial PORNO SEO backlinks, Black Hat SEO, Google SEO fast ranking ↑↑↑ Telegram: @seo7878 ZYHIn↑↑↑Black Hat SEO backlinks, focusing on Black Hat SEO, Google SEO fast ranking ↑↑↑ Telegram: @seo7878 Rdmc0↑↑↑Black Hat SEO backlinks, focusing on Black Hat SEO, Google
FREE MONEY | FREE MONEY ONLINE | GET FREE MONEY NOW | Telegram: @seo7878 H2JpP↑↑↑Hack Tutorial PORNO SEO backlinks, Black Hat SEO, Google SEO fast ranking ↑↑↑ Telegram: @seo7878 ZYHIn↑↑↑Black Hat SEO backlinks, focusing on Black Hat SEO, Google SEO fast ranking ↑↑↑ Telegram: @seo7878 Rdmc0↑↑↑Black Hat SEO backlinks, focusing on Black Hat SEO, Google
AjgKw↑↑↑Black Hat SEO backlinks, focusing on Black Hat SEO, Google Raking AjgKw↑↑↑Black Hat SEO backlinks, focusing on Black Hat SEO, Google Raking AjgKw↑↑↑Black Hat SEO backlinks, focusing on Black Hat SEO, Google Raking
h58fg4↑↑↑Black Hat SEO backlinks, focusing on Black Hat SEO, Google Raking
AjgKw↑↑↑Black Hat SEO backlinks, focusing on Black Hat SEO, Google Raking AjgKw↑↑↑Black Hat SEO backlinks, focusing on Black Hat SEO, Google Raking
AjgKw↑↑↑Black Hat SEO backlinks, focusing on Black Hat SEO, Google Raking AjgKw↑↑↑Black Hat SEO backlinks, focusing on Black Hat SEO, Google Raking
AjgKw↑↑↑Black Hat SEO backlinks, focusing on Black Hat SEO, Google Raking AjgKw↑↑↑Black Hat SEO backlinks, focusing on Black Hat SEO, Google Raking
FREE MONEY | FREE MONEY ONLINE | GET FREE MONEY NOW | Telegram: @seo7878 H2JpP↑↑↑Hack Tutorial PORNO SEO backlinks, Black Hat SEO, Google SEO fast ranking ↑↑↑ Telegram: @seo7878 ZYHIn↑↑↑Black Hat SEO backlinks, focusing on Black Hat SEO, Google SEO fast ranking ↑↑↑ Telegram: @seo7878 Rdmc0↑↑↑Black Hat SEO backlinks, focusing on Black Hat SEO, Google
h58fg4↑↑↑Black Hat SEO backlinks, focusing on Black Hat SEO, Google Raking
h58fg4↑↑↑Black Hat SEO backlinks, focusing on Black Hat SEO, Google Raking
FREE MONEY | FREE MONEY ONLINE | GET FREE MONEY NOW | Telegram: @seo7878 H2JpP↑↑↑Hack Tutorial PORNO SEO backlinks, Black Hat SEO, Google SEO fast ranking ↑↑↑ Telegram: @seo7878 ZYHIn↑↑↑Black Hat SEO backlinks, focusing on Black Hat SEO, Google SEO fast ranking ↑↑↑ Telegram: @seo7878 Rdmc0↑↑↑Black Hat SEO backlinks, focusing on Black Hat SEO, Google
h58fg4↑↑↑Black Hat SEO backlinks, focusing on Black Hat SEO, Google Raking
FREE MONEY | FREE MONEY ONLINE | GET FREE MONEY NOW | Telegram: @seo7878 H2JpP↑↑↑Hack Tutorial PORNO SEO backlinks, Black Hat SEO, Google SEO fast ranking ↑↑↑ Telegram: @seo7878 ZYHIn↑↑↑Black Hat SEO backlinks, focusing on Black Hat SEO, Google SEO fast ranking ↑↑↑ Telegram: @seo7878 Rdmc0↑↑↑Black Hat SEO backlinks, focusing on Black Hat SEO, Google
vape zombie narkoba
AjgKw↑↑↑Black Hat SEO backlinks, focusing on Black Hat SEO, Google Raking AjgKw↑↑↑Black Hat SEO backlinks, focusing on Black Hat SEO, Google Raking
FREE MONEY | FREE MONEY ONLINE | GET FREE MONEY NOW | Telegram: @seo7878 H2JpP↑↑↑Hack Tutorial PORNO SEO backlinks, Black Hat SEO, Google SEO fast ranking ↑↑↑ Telegram: @seo7878 ZYHIn↑↑↑Black Hat SEO backlinks, focusing on Black Hat SEO, Google SEO fast ranking ↑↑↑ Telegram: @seo7878 Rdmc0↑↑↑Black Hat SEO backlinks, focusing on Black Hat SEO, Google
h58fg4↑↑↑Black Hat SEO backlinks, focusing on Black Hat SEO, Google Raking
AjgKw↑↑↑Black Hat SEO backlinks, focusing on Black Hat SEO, Google Raking AjgKw↑↑↑Black Hat SEO backlinks, focusing on Black Hat SEO, Google Raking AjgKw↑↑↑Black Hat SEO backlinks, focusing on Black Hat SEO, Google Raking
AjgKw↑↑↑Black Hat SEO backlinks, focusing on Black Hat SEO, Google Raking AjgKw↑↑↑Black Hat SEO backlinks, focusing on Black Hat SEO, Google Raking AjgKw↑↑↑Black Hat SEO backlinks, focusing on Black Hat SEO, Google Raking
FREE MONEY | FREE MONEY ONLINE | GET FREE MONEY NOW | Telegram: @seo7878 H2JpP↑↑↑Hack Tutorial PORNO SEO backlinks, Black Hat SEO, Google SEO fast ranking ↑↑↑ Telegram: @seo7878 ZYHIn↑↑↑Black Hat SEO backlinks, focusing on Black Hat SEO, Google SEO fast ranking ↑↑↑ Telegram: @seo7878 Rdmc0↑↑↑Black Hat SEO backlinks, focusing on Black Hat SEO, Google
FREE MONEY | FREE MONEY ONLINE | GET FREE MONEY NOW | Telegram: @seo7878 H2JpP↑↑↑Hack Tutorial PORNO SEO backlinks, Black Hat SEO, Google SEO fast ranking ↑↑↑ Telegram: @seo7878 ZYHIn↑↑↑Black Hat SEO backlinks, focusing on Black Hat SEO, Google SEO fast ranking ↑↑↑ Telegram: @seo7878 Rdmc0↑↑↑Black Hat SEO backlinks, focusing on Black Hat SEO, Google
FREE MONEY | FREE MONEY ONLINE | GET FREE MONEY NOW | Telegram: @seo7878 H2JpP↑↑↑Hack Tutorial PORNO SEO backlinks, Black Hat SEO, Google SEO fast ranking ↑↑↑ Telegram: @seo7878 ZYHIn↑↑↑Black Hat SEO backlinks, focusing on Black Hat SEO, Google SEO fast ranking ↑↑↑ Telegram: @seo7878 Rdmc0↑↑↑Black Hat SEO backlinks, focusing on Black Hat SEO, Google
FREE MONEY | FREE MONEY ONLINE | GET FREE MONEY NOW | Telegram: @seo7878 H2JpP↑↑↑Hack Tutorial PORNO SEO backlinks, Black Hat SEO, Google SEO fast ranking ↑↑↑ Telegram: @seo7878 ZYHIn↑↑↑Black Hat SEO backlinks, focusing on Black Hat SEO, Google SEO fast ranking ↑↑↑ Telegram: @seo7878 Rdmc0↑↑↑Black Hat SEO backlinks, focusing on Black Hat SEO, Google
FREE MONEY | FREE MONEY ONLINE | GET FREE MONEY NOW | Telegram: @seo7878 H2JpP↑↑↑Hack Tutorial PORNO SEO backlinks, Black Hat SEO, Google SEO fast ranking ↑↑↑ Telegram: @seo7878 ZYHIn↑↑↑Black Hat SEO backlinks, focusing on Black Hat SEO, Google SEO fast ranking ↑↑↑ Telegram: @seo7878 Rdmc0↑↑↑Black Hat SEO backlinks, focusing on Black Hat SEO, Google
FREE MONEY | FREE MONEY ONLINE | GET FREE MONEY NOW | Telegram: @seo7878 H2JpP↑↑↑Hack Tutorial PORNO SEO backlinks, Black Hat SEO, Google SEO fast ranking ↑↑↑ Telegram: @seo7878 ZYHIn↑↑↑Black Hat SEO backlinks, focusing on Black Hat SEO, Google SEO fast ranking ↑↑↑ Telegram: @seo7878 Rdmc0↑↑↑Black Hat SEO backlinks, focusing on Black Hat SEO, Google
FREE MONEY | FREE MONEY ONLINE | GET FREE MONEY NOW | Telegram: @seo7878 H2JpP↑↑↑Hack Tutorial PORNO SEO backlinks, Black Hat SEO, Google SEO fast ranking ↑↑↑ Telegram: @seo7878 ZYHIn↑↑↑Black Hat SEO backlinks, focusing on Black Hat SEO, Google SEO fast ranking ↑↑↑ Telegram: @seo7878 Rdmc0↑↑↑Black Hat SEO backlinks, focusing on Black Hat SEO, Google
FREE MONEY | FREE MONEY ONLINE | GET FREE MONEY NOW | Telegram: @seo7878 H2JpP↑↑↑Hack Tutorial PORNO SEO backlinks, Black Hat SEO, Google SEO fast ranking ↑↑↑ Telegram: @seo7878 ZYHIn↑↑↑Black Hat SEO backlinks, focusing on Black Hat SEO, Google SEO fast ranking ↑↑↑ Telegram: @seo7878 Rdmc0↑↑↑Black Hat SEO backlinks, focusing on Black Hat SEO, Google
h58fg4↑↑↑Black Hat SEO backlinks, focusing on Black Hat SEO, Google Raking
FREE MONEY | FREE MONEY ONLINE | GET FREE MONEY NOW | Telegram: @seo7878 H2JpP↑↑↑Hack Tutorial PORNO SEO backlinks, Black Hat SEO, Google SEO fast ranking ↑↑↑ Telegram: @seo7878 ZYHIn↑↑↑Black Hat SEO backlinks, focusing on Black Hat SEO, Google SEO fast ranking ↑↑↑ Telegram: @seo7878 Rdmc0↑↑↑Black Hat SEO backlinks, focusing on Black Hat SEO, Google
FREE MONEY | FREE MONEY ONLINE | GET FREE MONEY NOW | Telegram: @seo7878 H2JpP↑↑↑Hack Tutorial PORNO SEO backlinks, Black Hat SEO, Google SEO fast ranking ↑↑↑ Telegram: @seo7878 ZYHIn↑↑↑Black Hat SEO backlinks, focusing on Black Hat SEO, Google SEO fast ranking ↑↑↑ Telegram: @seo7878 Rdmc0↑↑↑Black Hat SEO backlinks, focusing on Black Hat SEO, Google
FREE MONEY | FREE MONEY ONLINE | GET FREE MONEY NOW | Telegram: @seo7878 H2JpP↑↑↑Hack Tutorial PORNO SEO backlinks, Black Hat SEO, Google SEO fast ranking ↑↑↑ Telegram: @seo7878 ZYHIn↑↑↑Black Hat SEO backlinks, focusing on Black Hat SEO, Google SEO fast ranking ↑↑↑ Telegram: @seo7878 Rdmc0↑↑↑Black Hat SEO backlinks, focusing on Black Hat SEO, Google
FREE MONEY | FREE MONEY ONLINE | GET FREE MONEY NOW | Telegram: @seo7878 H2JpP↑↑↑Hack Tutorial PORNO SEO backlinks, Black Hat SEO, Google SEO fast ranking ↑↑↑ Telegram: @seo7878 ZYHIn↑↑↑Black Hat SEO backlinks, focusing on Black Hat SEO, Google SEO fast ranking ↑↑↑ Telegram: @seo7878 Rdmc0↑↑↑Black Hat SEO backlinks, focusing on Black Hat SEO, Google
FREE MONEY | FREE MONEY ONLINE | GET FREE MONEY NOW | Telegram: @seo7878 H2JpP↑↑↑Hack Tutorial PORNO SEO backlinks, Black Hat SEO, Google SEO fast ranking ↑↑↑ Telegram: @seo7878 ZYHIn↑↑↑Black Hat SEO backlinks, focusing on Black Hat SEO, Google SEO fast ranking ↑↑↑ Telegram: @seo7878 Rdmc0↑↑↑Black Hat SEO backlinks, focusing on Black Hat SEO, Google
FREE MONEY | FREE MONEY ONLINE | GET FREE MONEY NOW | Telegram: @seo7878 H2JpP↑↑↑Hack Tutorial PORNO SEO backlinks, Black Hat SEO, Google SEO fast ranking ↑↑↑ Telegram: @seo7878 ZYHIn↑↑↑Black Hat SEO backlinks, focusing on Black Hat SEO, Google SEO fast ranking ↑↑↑ Telegram: @seo7878 Rdmc0↑↑↑Black Hat SEO backlinks, focusing on Black Hat SEO, Google
FREE MONEY | FREE MONEY ONLINE | GET FREE MONEY NOW | Telegram: @seo7878 H2JpP↑↑↑Hack Tutorial PORNO SEO backlinks, Black Hat SEO, Google SEO fast ranking ↑↑↑ Telegram: @seo7878 ZYHIn↑↑↑Black Hat SEO backlinks, focusing on Black Hat SEO, Google SEO fast ranking ↑↑↑ Telegram: @seo7878 Rdmc0↑↑↑Black Hat SEO backlinks, focusing on Black Hat SEO, Google
FREE MONEY | FREE MONEY ONLINE | GET FREE MONEY NOW | Telegram: @seo7878 H2JpP↑↑↑Hack Tutorial PORNO SEO backlinks, Black Hat SEO, Google SEO fast ranking ↑↑↑ Telegram: @seo7878 ZYHIn↑↑↑Black Hat SEO backlinks, focusing on Black Hat SEO, Google SEO fast ranking ↑↑↑ Telegram: @seo7878 Rdmc0↑↑↑Black Hat SEO backlinks, focusing on Black Hat SEO, Google
FREE MONEY | FREE MONEY ONLINE | GET FREE MONEY NOW | Telegram: @seo7878 H2JpP↑↑↑Hack Tutorial PORNO SEO backlinks, Black Hat SEO, Google SEO fast ranking ↑↑↑ Telegram: @seo7878 ZYHIn↑↑↑Black Hat SEO backlinks, focusing on Black Hat SEO, Google SEO fast ranking ↑↑↑ Telegram: @seo7878 Rdmc0↑↑↑Black Hat SEO backlinks, focusing on Black Hat SEO, Google
h58fg4↑↑↑Black Hat SEO backlinks, focusing on Black Hat SEO, Google Raking
h58fg4↑↑↑Black Hat SEO backlinks, focusing on Black Hat SEO, Google Raking
FREE MONEY | FREE MONEY ONLINE | GET FREE MONEY NOW | Telegram: @seo7878 H2JpP↑↑↑Hack Tutorial PORNO SEO backlinks, Black Hat SEO, Google SEO fast ranking ↑↑↑ Telegram: @seo7878 ZYHIn↑↑↑Black Hat SEO backlinks, focusing on Black Hat SEO, Google SEO fast ranking ↑↑↑ Telegram: @seo7878 Rdmc0↑↑↑Black Hat SEO backlinks, focusing on Black Hat SEO, Google
FREE MONEY | FREE MONEY ONLINE | GET FREE MONEY NOW | Telegram: @seo7878 H2JpP↑↑↑Hack Tutorial PORNO SEO backlinks, Black Hat SEO, Google SEO fast ranking ↑↑↑ Telegram: @seo7878 ZYHIn↑↑↑Black Hat SEO backlinks, focusing on Black Hat SEO, Google SEO fast ranking ↑↑↑ Telegram: @seo7878 Rdmc0↑↑↑Black Hat SEO backlinks, focusing on Black Hat SEO, Google
FREE MONEY | FREE MONEY ONLINE | GET FREE MONEY NOW | Telegram: @seo7878 H2JpP↑↑↑Hack Tutorial PORNO SEO backlinks, Black Hat SEO, Google SEO fast ranking ↑↑↑ Telegram: @seo7878 ZYHIn↑↑↑Black Hat SEO backlinks, focusing on Black Hat SEO, Google SEO fast ranking ↑↑↑ Telegram: @seo7878 Rdmc0↑↑↑Black Hat SEO backlinks, focusing on Black Hat SEO, Google
FREE MONEY | FREE MONEY ONLINE | GET FREE MONEY NOW | Telegram: @seo7878 H2JpP↑↑↑Hack Tutorial PORNO SEO backlinks, Black Hat SEO, Google SEO fast ranking ↑↑↑ Telegram: @seo7878 ZYHIn↑↑↑Black Hat SEO backlinks, focusing on Black Hat SEO, Google SEO fast ranking ↑↑↑ Telegram: @seo7878 Rdmc0↑↑↑Black Hat SEO backlinks, focusing on Black Hat SEO, Google
FREE MONEY | FREE MONEY ONLINE | GET FREE MONEY NOW | Telegram: @seo7878 H2JpP↑↑↑Hack Tutorial PORNO SEO backlinks, Black Hat SEO, Google SEO fast ranking ↑↑↑ Telegram: @seo7878 ZYHIn↑↑↑Black Hat SEO backlinks, focusing on Black Hat SEO, Google SEO fast ranking ↑↑↑ Telegram: @seo7878 Rdmc0↑↑↑Black Hat SEO backlinks, focusing on Black Hat SEO, Google
FREE MONEY | FREE MONEY ONLINE | GET FREE MONEY NOW | Telegram: @seo7878 H2JpP↑↑↑Hack Tutorial PORNO SEO backlinks, Black Hat SEO, Google SEO fast ranking ↑↑↑ Telegram: @seo7878 ZYHIn↑↑↑Black Hat SEO backlinks, focusing on Black Hat SEO, Google SEO fast ranking ↑↑↑ Telegram: @seo7878 Rdmc0↑↑↑Black Hat SEO backlinks, focusing on Black Hat SEO, Google
FREE MONEY | FREE MONEY ONLINE | GET FREE MONEY NOW | Telegram: @seo7878 H2JpP↑↑↑Hack Tutorial PORNO SEO backlinks, Black Hat SEO, Google SEO fast ranking ↑↑↑ Telegram: @seo7878 ZYHIn↑↑↑Black Hat SEO backlinks, focusing on Black Hat SEO, Google SEO fast ranking ↑↑↑ Telegram: @seo7878 Rdmc0↑↑↑Black Hat SEO backlinks, focusing on Black Hat SEO, Google
FREE MONEY | FREE MONEY ONLINE | GET FREE MONEY NOW | Telegram: @seo7878 H2JpP↑↑↑Hack Tutorial PORNO SEO backlinks, Black Hat SEO, Google SEO fast ranking ↑↑↑ Telegram: @seo7878 ZYHIn↑↑↑Black Hat SEO backlinks, focusing on Black Hat SEO, Google SEO fast ranking ↑↑↑ Telegram: @seo7878 Rdmc0↑↑↑Black Hat SEO backlinks, focusing on Black Hat SEO, Google
FREE MONEY | FREE MONEY ONLINE | GET FREE MONEY NOW | Telegram: @seo7878 H2JpP↑↑↑Hack Tutorial PORNO SEO backlinks, Black Hat SEO, Google SEO fast ranking ↑↑↑ Telegram: @seo7878 ZYHIn↑↑↑Black Hat SEO backlinks, focusing on Black Hat SEO, Google SEO fast ranking ↑↑↑ Telegram: @seo7878 Rdmc0↑↑↑Black Hat SEO backlinks, focusing on Black Hat SEO, Google
FREE MONEY | FREE MONEY ONLINE | GET FREE MONEY NOW | Telegram: @seo7878 H2JpP↑↑↑Hack Tutorial PORNO SEO backlinks, Black Hat SEO, Google SEO fast ranking ↑↑↑ Telegram: @seo7878 ZYHIn↑↑↑Black Hat SEO backlinks, focusing on Black Hat SEO, Google SEO fast ranking ↑↑↑ Telegram: @seo7878 Rdmc0↑↑↑Black Hat SEO backlinks, focusing on Black Hat SEO, Google
FREE MONEY | FREE MONEY ONLINE | GET FREE MONEY NOW | Telegram: @seo7878 H2JpP↑↑↑Hack Tutorial PORNO SEO backlinks, Black Hat SEO, Google SEO fast ranking ↑↑↑ Telegram: @seo7878 ZYHIn↑↑↑Black Hat SEO backlinks, focusing on Black Hat SEO, Google SEO fast ranking ↑↑↑ Telegram: @seo7878 Rdmc0↑↑↑Black Hat SEO backlinks, focusing on Black Hat SEO, Google
FREE MONEY | FREE MONEY ONLINE | GET FREE MONEY NOW | Telegram: @seo7878 H2JpP↑↑↑Hack Tutorial PORNO SEO backlinks, Black Hat SEO, Google SEO fast ranking ↑↑↑ Telegram: @seo7878 ZYHIn↑↑↑Black Hat SEO backlinks, focusing on Black Hat SEO, Google SEO fast ranking ↑↑↑ Telegram: @seo7878 Rdmc0↑↑↑Black Hat SEO backlinks, focusing on Black Hat SEO, Google
FREE MONEY | FREE MONEY ONLINE | GET FREE MONEY NOW | Telegram: @seo7878 H2JpP↑↑↑Hack Tutorial PORNO SEO backlinks, Black Hat SEO, Google SEO fast ranking ↑↑↑ Telegram: @seo7878 ZYHIn↑↑↑Black Hat SEO backlinks, focusing on Black Hat SEO, Google SEO fast ranking ↑↑↑ Telegram: @seo7878 Rdmc0↑↑↑Black Hat SEO backlinks, focusing on Black Hat SEO, Google
FREE MONEY | FREE MONEY ONLINE | GET FREE MONEY NOW | Telegram: @seo7878 H2JpP↑↑↑Hack Tutorial PORNO SEO backlinks, Black Hat SEO, Google SEO fast ranking ↑↑↑ Telegram: @seo7878 ZYHIn↑↑↑Black Hat SEO backlinks, focusing on Black Hat SEO, Google SEO fast ranking ↑↑↑ Telegram: @seo7878 Rdmc0↑↑↑Black Hat SEO backlinks, focusing on Black Hat SEO, Google
vape zombie narkoba
FREE MONEY | FREE MONEY ONLINE | GET FREE MONEY NOW | Telegram: @seo7878 H2JpP↑↑↑Hack Tutorial PORNO SEO backlinks, Black Hat SEO, Google SEO fast ranking ↑↑↑ Telegram: @seo7878 ZYHIn↑↑↑Black Hat SEO backlinks, focusing on Black Hat SEO, Google SEO fast ranking ↑↑↑ Telegram: @seo7878 Rdmc0↑↑↑Black Hat SEO backlinks, focusing on Black Hat SEO, Google
FREE MONEY | FREE MONEY ONLINE | GET FREE MONEY NOW | Telegram: @seo7878 H2JpP↑↑↑Hack Tutorial PORNO SEO backlinks, Black Hat SEO, Google SEO fast ranking ↑↑↑ Telegram: @seo7878 ZYHIn↑↑↑Black Hat SEO backlinks, focusing on Black Hat SEO, Google SEO fast ranking ↑↑↑ Telegram: @seo7878 Rdmc0↑↑↑Black Hat SEO backlinks, focusing on Black Hat SEO, Google
FREE MONEY | FREE MONEY ONLINE | GET FREE MONEY NOW | Telegram: @seo7878 H2JpP↑↑↑Hack Tutorial PORNO SEO backlinks, Black Hat SEO, Google SEO fast ranking ↑↑↑ Telegram: @seo7878 ZYHIn↑↑↑Black Hat SEO backlinks, focusing on Black Hat SEO, Google SEO fast ranking ↑↑↑ Telegram: @seo7878 Rdmc0↑↑↑Black Hat SEO backlinks, focusing on Black Hat SEO, Google
FREE MONEY | FREE MONEY ONLINE | GET FREE MONEY NOW | Telegram: @seo7878 H2JpP↑↑↑Hack Tutorial PORNO SEO backlinks, Black Hat SEO, Google SEO fast ranking ↑↑↑ Telegram: @seo7878 ZYHIn↑↑↑Black Hat SEO backlinks, focusing on Black Hat SEO, Google SEO fast ranking ↑↑↑ Telegram: @seo7878 Rdmc0↑↑↑Black Hat SEO backlinks, focusing on Black Hat SEO, Google
FREE MONEY | FREE MONEY ONLINE | GET FREE MONEY NOW | Telegram: @seo7878 H2JpP↑↑↑Hack Tutorial PORNO SEO backlinks, Black Hat SEO, Google SEO fast ranking ↑↑↑ Telegram: @seo7878 ZYHIn↑↑↑Black Hat SEO backlinks, focusing on Black Hat SEO, Google SEO fast ranking ↑↑↑ Telegram: @seo7878 Rdmc0↑↑↑Black Hat SEO backlinks, focusing on Black Hat SEO, Google
FREE MONEY | FREE MONEY ONLINE | GET FREE MONEY NOW | Telegram: @seo7878 H2JpP↑↑↑Hack Tutorial PORNO SEO backlinks, Black Hat SEO, Google SEO fast ranking ↑↑↑ Telegram: @seo7878 ZYHIn↑↑↑Black Hat SEO backlinks, focusing on Black Hat SEO, Google SEO fast ranking ↑↑↑ Telegram: @seo7878 Rdmc0↑↑↑Black Hat SEO backlinks, focusing on Black Hat SEO, Google
FREE MONEY | FREE MONEY ONLINE | GET FREE MONEY NOW | Telegram: @seo7878 H2JpP↑↑↑Hack Tutorial PORNO SEO backlinks, Black Hat SEO, Google SEO fast ranking ↑↑↑ Telegram: @seo7878 ZYHIn↑↑↑Black Hat SEO backlinks, focusing on Black Hat SEO, Google SEO fast ranking ↑↑↑ Telegram: @seo7878 Rdmc0↑↑↑Black Hat SEO backlinks, focusing on Black Hat SEO, Google
FREE MONEY | FREE MONEY ONLINE | GET FREE MONEY NOW | Telegram: @seo7878 H2JpP↑↑↑Hack Tutorial PORNO SEO backlinks, Black Hat SEO, Google SEO fast ranking ↑↑↑ Telegram: @seo7878 ZYHIn↑↑↑Black Hat SEO backlinks, focusing on Black Hat SEO, Google SEO fast ranking ↑↑↑ Telegram: @seo7878 Rdmc0↑↑↑Black Hat SEO backlinks, focusing on Black Hat SEO, Google
FREE MONEY | FREE MONEY ONLINE | GET FREE MONEY NOW | Telegram: @seo7878 H2JpP↑↑↑Hack Tutorial PORNO SEO backlinks, Black Hat SEO, Google SEO fast ranking ↑↑↑ Telegram: @seo7878 ZYHIn↑↑↑Black Hat SEO backlinks, focusing on Black Hat SEO, Google SEO fast ranking ↑↑↑ Telegram: @seo7878 Rdmc0↑↑↑Black Hat SEO backlinks, focusing on Black Hat SEO, Google
vape zombie narkoba
FREE MONEY | FREE MONEY ONLINE | GET FREE MONEY NOW | Telegram: @seo7878 H2JpP↑↑↑Hack Tutorial PORNO SEO backlinks, Black Hat SEO, Google SEO fast ranking ↑↑↑ Telegram: @seo7878 ZYHIn↑↑↑Black Hat SEO backlinks, focusing on Black Hat SEO, Google SEO fast ranking ↑↑↑ Telegram: @seo7878 Rdmc0↑↑↑Black Hat SEO backlinks, focusing on Black Hat SEO, Google
FREE MONEY | FREE MONEY ONLINE | GET FREE MONEY NOW | Telegram: @seo7878 H2JpP↑↑↑Hack Tutorial PORNO SEO backlinks, Black Hat SEO, Google SEO fast ranking ↑↑↑ Telegram: @seo7878 ZYHIn↑↑↑Black Hat SEO backlinks, focusing on Black Hat SEO, Google SEO fast ranking ↑↑↑ Telegram: @seo7878 Rdmc0↑↑↑Black Hat SEO backlinks, focusing on Black Hat SEO, Google
FREE MONEY | FREE MONEY ONLINE | GET FREE MONEY NOW | Telegram: @seo7878 H2JpP↑↑↑Hack Tutorial PORNO SEO backlinks, Black Hat SEO, Google SEO fast ranking ↑↑↑ Telegram: @seo7878 ZYHIn↑↑↑Black Hat SEO backlinks, focusing on Black Hat SEO, Google SEO fast ranking ↑↑↑ Telegram: @seo7878 Rdmc0↑↑↑Black Hat SEO backlinks, focusing on Black Hat SEO, Google
FREE MONEY | FREE MONEY ONLINE | GET FREE MONEY NOW | Telegram: @seo7878 H2JpP↑↑↑Hack Tutorial PORNO SEO backlinks, Black Hat SEO, Google SEO fast ranking ↑↑↑ Telegram: @seo7878 ZYHIn↑↑↑Black Hat SEO backlinks, focusing on Black Hat SEO, Google SEO fast ranking ↑↑↑ Telegram: @seo7878 Rdmc0↑↑↑Black Hat SEO backlinks, focusing on Black Hat SEO, Google
FREE MONEY | FREE MONEY ONLINE | GET FREE MONEY NOW | Telegram: @seo7878 H2JpP↑↑↑Hack Tutorial PORNO SEO backlinks, Black Hat SEO, Google SEO fast ranking ↑↑↑ Telegram: @seo7878 ZYHIn↑↑↑Black Hat SEO backlinks, focusing on Black Hat SEO, Google SEO fast ranking ↑↑↑ Telegram: @seo7878 Rdmc0↑↑↑Black Hat SEO backlinks, focusing on Black Hat SEO, Google
FREE MONEY | FREE MONEY ONLINE | GET FREE MONEY NOW | Telegram: @seo7878 H2JpP↑↑↑Hack Tutorial PORNO SEO backlinks, Black Hat SEO, Google SEO fast ranking ↑↑↑ Telegram: @seo7878 ZYHIn↑↑↑Black Hat SEO backlinks, focusing on Black Hat SEO, Google SEO fast ranking ↑↑↑ Telegram: @seo7878 Rdmc0↑↑↑Black Hat SEO backlinks, focusing on Black Hat SEO, Google
FREE MONEY | FREE MONEY ONLINE | GET FREE MONEY NOW | Telegram: @seo7878 H2JpP↑↑↑Hack Tutorial PORNO SEO backlinks, Black Hat SEO, Google SEO fast ranking ↑↑↑ Telegram: @seo7878 ZYHIn↑↑↑Black Hat SEO backlinks, focusing on Black Hat SEO, Google SEO fast ranking ↑↑↑ Telegram: @seo7878 Rdmc0↑↑↑Black Hat SEO backlinks, focusing on Black Hat SEO, Google
h34dqqd↑↑↑Black Hat SEO backlinks, focusing on Black Hat SEO, Google Raking
FREE MONEY | FREE MONEY ONLINE | GET FREE MONEY NOW | Telegram: @seo7878 H2JpP↑↑↑Hack Tutorial PORNO SEO backlinks, Black Hat SEO, Google SEO fast ranking ↑↑↑ Telegram: @seo7878 ZYHIn↑↑↑Black Hat SEO backlinks, focusing on Black Hat SEO, Google SEO fast ranking ↑↑↑ Telegram: @seo7878 Rdmc0↑↑↑Black Hat SEO backlinks, focusing on Black Hat SEO, Google
FREE MONEY | FREE MONEY ONLINE | GET FREE MONEY NOW | Telegram: @seo7878 H2JpP↑↑↑Hack Tutorial PORNO SEO backlinks, Black Hat SEO, Google SEO fast ranking ↑↑↑ Telegram: @seo7878 ZYHIn↑↑↑Black Hat SEO backlinks, focusing on Black Hat SEO, Google SEO fast ranking ↑↑↑ Telegram: @seo7878 Rdmc0↑↑↑Black Hat SEO backlinks, focusing on Black Hat SEO, Google
FREE MONEY | FREE MONEY ONLINE | GET FREE MONEY NOW | Telegram: @seo7878 H2JpP↑↑↑Hack Tutorial PORNO SEO backlinks, Black Hat SEO, Google SEO fast ranking ↑↑↑ Telegram: @seo7878 ZYHIn↑↑↑Black Hat SEO backlinks, focusing on Black Hat SEO, Google SEO fast ranking ↑↑↑ Telegram: @seo7878 Rdmc0↑↑↑Black Hat SEO backlinks, focusing on Black Hat SEO, Google
FREE MONEY | FREE MONEY ONLINE | GET FREE MONEY NOW | Telegram: @seo7878 H2JpP↑↑↑Hack Tutorial PORNO SEO backlinks, Black Hat SEO, Google SEO fast ranking ↑↑↑ Telegram: @seo7878 ZYHIn↑↑↑Black Hat SEO backlinks, focusing on Black Hat SEO, Google SEO fast ranking ↑↑↑ Telegram: @seo7878 Rdmc0↑↑↑Black Hat SEO backlinks, focusing on Black Hat SEO, Google
FREE MONEY | FREE MONEY ONLINE | GET FREE MONEY NOW | Telegram: @seo7878 H2JpP↑↑↑Hack Tutorial PORNO SEO backlinks, Black Hat SEO, Google SEO fast ranking ↑↑↑ Telegram: @seo7878 ZYHIn↑↑↑Black Hat SEO backlinks, focusing on Black Hat SEO, Google SEO fast ranking ↑↑↑ Telegram: @seo7878 Rdmc0↑↑↑Black Hat SEO backlinks, focusing on Black Hat SEO, Google
FREE MONEY | FREE MONEY ONLINE | GET FREE MONEY NOW | Telegram: @seo7878 H2JpP↑↑↑Hack Tutorial PORNO SEO backlinks, Black Hat SEO, Google SEO fast ranking ↑↑↑ Telegram: @seo7878 ZYHIn↑↑↑Black Hat SEO backlinks, focusing on Black Hat SEO, Google SEO fast ranking ↑↑↑ Telegram: @seo7878 Rdmc0↑↑↑Black Hat SEO backlinks, focusing on Black Hat SEO, Google
FREE MONEY | FREE MONEY ONLINE | GET FREE MONEY NOW | Telegram: @seo7878 H2JpP↑↑↑Hack Tutorial PORNO SEO backlinks, Black Hat SEO, Google SEO fast ranking ↑↑↑ Telegram: @seo7878 ZYHIn↑↑↑Black Hat SEO backlinks, focusing on Black Hat SEO, Google SEO fast ranking ↑↑↑ Telegram: @seo7878 Rdmc0↑↑↑Black Hat SEO backlinks, focusing on Black Hat SEO, Google
FREE MONEY | FREE MONEY ONLINE | GET FREE MONEY NOW | Telegram: @seo7878 H2JpP↑↑↑Hack Tutorial PORNO SEO backlinks, Black Hat SEO, Google SEO fast ranking ↑↑↑ Telegram: @seo7878 ZYHIn↑↑↑Black Hat SEO backlinks, focusing on Black Hat SEO, Google SEO fast ranking ↑↑↑ Telegram: @seo7878 Rdmc0↑↑↑Black Hat SEO backlinks, focusing on Black Hat SEO, Google
eb34edf↑↑↑Black Hat SEO backlinks, focusing on Black Hat SEO, Google Raking
eb34edf↑↑↑Black Hat SEO backlinks, focusing on Black Hat SEO, Google Raking
eb34edf↑↑↑Black Hat SEO backlinks, focusing on Black Hat SEO, Google Raking
eb34edf↑↑↑Black Hat SEO backlinks, focusing on Black Hat SEO, Google Raking
eb34edf↑↑↑Black Hat SEO backlinks, focusing on Black Hat SEO, Google Raking
eb34edf↑↑↑Black Hat SEO backlinks, focusing on Black Hat SEO, Google Raking
FREE MONEY | FREE MONEY ONLINE | GET FREE MONEY NOW | Telegram: @seo7878 H2JpP↑↑↑Hack Tutorial PORNO SEO backlinks, Black Hat SEO, Google SEO fast ranking ↑↑↑ Telegram: @seo7878 ZYHIn↑↑↑Black Hat SEO backlinks, focusing on Black Hat SEO, Google SEO fast ranking ↑↑↑ Telegram: @seo7878 Rdmc0↑↑↑Black Hat SEO backlinks, focusing on Black Hat SEO, Google
FREE MONEY | FREE MONEY ONLINE | GET FREE MONEY NOW | Telegram: @seo7878 H2JpP↑↑↑Hack Tutorial PORNO SEO backlinks, Black Hat SEO, Google SEO fast ranking ↑↑↑ Telegram: @seo7878 ZYHIn↑↑↑Black Hat SEO backlinks, focusing on Black Hat SEO, Google SEO fast ranking ↑↑↑ Telegram: @seo7878 Rdmc0↑↑↑Black Hat SEO backlinks, focusing on Black Hat SEO, Google
FREE MONEY | FREE MONEY ONLINE | GET FREE MONEY NOW | Telegram: @seo7878 H2JpP↑↑↑Hack Tutorial PORNO SEO backlinks, Black Hat SEO, Google SEO fast ranking ↑↑↑ Telegram: @seo7878 ZYHIn↑↑↑Black Hat SEO backlinks, focusing on Black Hat SEO, Google SEO fast ranking ↑↑↑ Telegram: @seo7878 Rdmc0↑↑↑Black Hat SEO backlinks, focusing on Black Hat SEO, Google
FREE MONEY | FREE MONEY ONLINE | GET FREE MONEY NOW | Telegram: @seo7878 H2JpP↑↑↑Hack Tutorial PORNO SEO backlinks, Black Hat SEO, Google SEO fast ranking ↑↑↑ Telegram: @seo7878 ZYHIn↑↑↑Black Hat SEO backlinks, focusing on Black Hat SEO, Google SEO fast ranking ↑↑↑ Telegram: @seo7878 Rdmc0↑↑↑Black Hat SEO backlinks, focusing on Black Hat SEO, Google
FREE MONEY | FREE MONEY ONLINE | GET FREE MONEY NOW | Telegram: @seo7878 H2JpP↑↑↑Hack Tutorial PORNO SEO backlinks, Black Hat SEO, Google SEO fast ranking ↑↑↑ Telegram: @seo7878 ZYHIn↑↑↑Black Hat SEO backlinks, focusing on Black Hat SEO, Google SEO fast ranking ↑↑↑ Telegram: @seo7878 Rdmc0↑↑↑Black Hat SEO backlinks, focusing on Black Hat SEO, Google
FREE MONEY | FREE MONEY ONLINE | GET FREE MONEY NOW | Telegram: @seo7878 H2JpP↑↑↑Hack Tutorial PORNO SEO backlinks, Black Hat SEO, Google SEO fast ranking ↑↑↑ Telegram: @seo7878 ZYHIn↑↑↑Black Hat SEO backlinks, focusing on Black Hat SEO, Google SEO fast ranking ↑↑↑ Telegram: @seo7878 Rdmc0↑↑↑Black Hat SEO backlinks, focusing on Black Hat SEO, Google
FREE MONEY | FREE MONEY ONLINE | GET FREE MONEY NOW | Telegram: @seo7878 H2JpP↑↑↑Hack Tutorial PORNO SEO backlinks, Black Hat SEO, Google SEO fast ranking ↑↑↑ Telegram: @seo7878 ZYHIn↑↑↑Black Hat SEO backlinks, focusing on Black Hat SEO, Google SEO fast ranking ↑↑↑ Telegram: @seo7878 Rdmc0↑↑↑Black Hat SEO backlinks, focusing on Black Hat SEO, Google
FREE MONEY | FREE MONEY ONLINE | GET FREE MONEY NOW | Telegram: @seo7878 H2JpP↑↑↑Hack Tutorial PORNO SEO backlinks, Black Hat SEO, Google SEO fast ranking ↑↑↑ Telegram: @seo7878 ZYHIn↑↑↑Black Hat SEO backlinks, focusing on Black Hat SEO, Google SEO fast ranking ↑↑↑ Telegram: @seo7878 Rdmc0↑↑↑Black Hat SEO backlinks, focusing on Black Hat SEO, Google
h58fg4↑↑↑Black Hat SEO backlinks, focusing on Black Hat SEO, Google Raking
FREE MONEY | FREE MONEY ONLINE | GET FREE MONEY NOW | Telegram: @seo7878 H2JpP↑↑↑Hack Tutorial PORNO SEO backlinks, Black Hat SEO, Google SEO fast ranking ↑↑↑ Telegram: @seo7878 ZYHIn↑↑↑Black Hat SEO backlinks, focusing on Black Hat SEO, Google SEO fast ranking ↑↑↑ Telegram: @seo7878 Rdmc0↑↑↑Black Hat SEO backlinks, focusing on Black Hat SEO, Google
FREE MONEY | FREE MONEY ONLINE | GET FREE MONEY NOW | Telegram: @seo7878 H2JpP↑↑↑Hack Tutorial PORNO SEO backlinks, Black Hat SEO, Google SEO fast ranking ↑↑↑ Telegram: @seo7878 ZYHIn↑↑↑Black Hat SEO backlinks, focusing on Black Hat SEO, Google SEO fast ranking ↑↑↑ Telegram: @seo7878 Rdmc0↑↑↑Black Hat SEO backlinks, focusing on Black Hat SEO, Google
FREE MONEY | FREE MONEY ONLINE | GET FREE MONEY NOW | Telegram: @seo7878 H2JpP↑↑↑Hack Tutorial PORNO SEO backlinks, Black Hat SEO, Google SEO fast ranking ↑↑↑ Telegram: @seo7878 ZYHIn↑↑↑Black Hat SEO backlinks, focusing on Black Hat SEO, Google SEO fast ranking ↑↑↑ Telegram: @seo7878 Rdmc0↑↑↑Black Hat SEO backlinks, focusing on Black Hat SEO, Google
FREE MONEY | FREE MONEY ONLINE | GET FREE MONEY NOW | Telegram: @seo7878 H2JpP↑↑↑Hack Tutorial PORNO SEO backlinks, Black Hat SEO, Google SEO fast ranking ↑↑↑ Telegram: @seo7878 ZYHIn↑↑↑Black Hat SEO backlinks, focusing on Black Hat SEO, Google SEO fast ranking ↑↑↑ Telegram: @seo7878 Rdmc0↑↑↑Black Hat SEO backlinks, focusing on Black Hat SEO, Google
FREE MONEY | FREE MONEY ONLINE | GET FREE MONEY NOW | Telegram: @seo7878 H2JpP↑↑↑Hack Tutorial PORNO SEO backlinks, Black Hat SEO, Google SEO fast ranking ↑↑↑ Telegram: @seo7878 ZYHIn↑↑↑Black Hat SEO backlinks, focusing on Black Hat SEO, Google SEO fast ranking ↑↑↑ Telegram: @seo7878 Rdmc0↑↑↑Black Hat SEO backlinks, focusing on Black Hat SEO, Google
FREE MONEY | FREE MONEY ONLINE | GET FREE MONEY NOW | Telegram: @seo7878 H2JpP↑↑↑Hack Tutorial PORNO SEO backlinks, Black Hat SEO, Google SEO fast ranking ↑↑↑ Telegram: @seo7878 ZYHIn↑↑↑Black Hat SEO backlinks, focusing on Black Hat SEO, Google SEO fast ranking ↑↑↑ Telegram: @seo7878 Rdmc0↑↑↑Black Hat SEO backlinks, focusing on Black Hat SEO, Google
h58fg4↑↑↑Black Hat SEO backlinks, focusing on Black Hat SEO, Google Raking
FREE MONEY | FREE MONEY ONLINE | GET FREE MONEY NOW | Telegram: @seo7878 H2JpP↑↑↑Hack Tutorial PORNO SEO backlinks, Black Hat SEO, Google SEO fast ranking ↑↑↑ Telegram: @seo7878 ZYHIn↑↑↑Black Hat SEO backlinks, focusing on Black Hat SEO, Google SEO fast ranking ↑↑↑ Telegram: @seo7878 Rdmc0↑↑↑Black Hat SEO backlinks, focusing on Black Hat SEO, Google
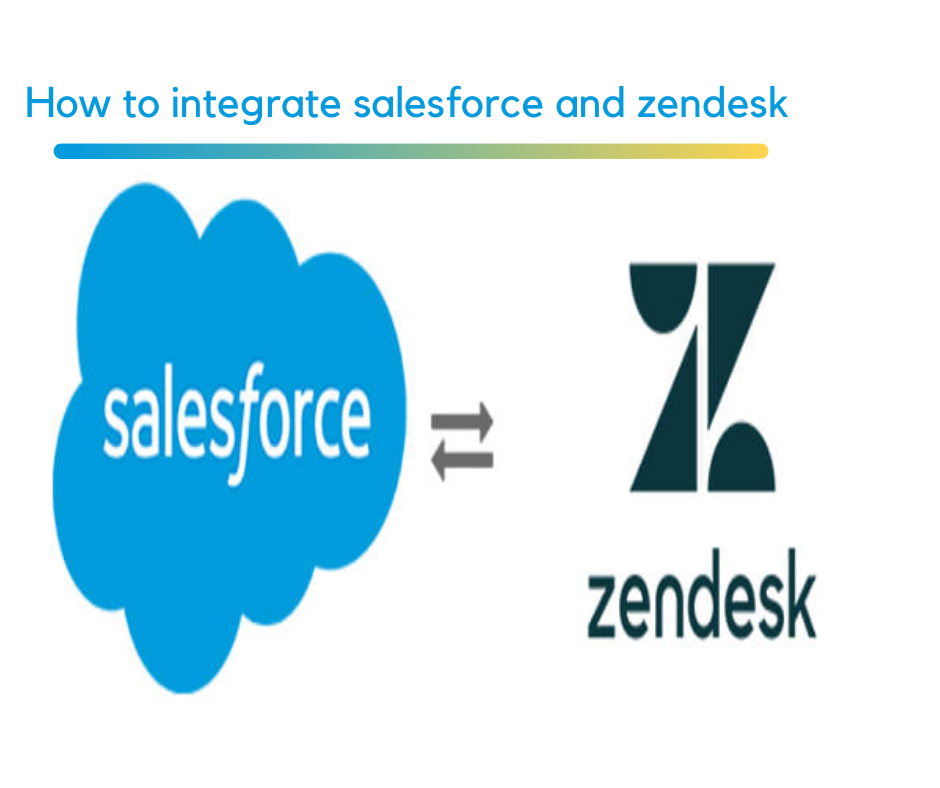
The significance of integration
Salesforce Zendesk integration techniques are responsible for the development of the increasing applications that can be worked out with the utilization of the Salesforce editions suggest developer edition, etc. Salesforce Zendeskintegration techniques are also supporting the additions including professionals with the AP add-ons and the salesforce API rights.
Salesforce Zendesk integration accounts can be administered with the help of the support administrator of both platforms so that integration can be inculcated. Salesforce Zendesk integration techniques can be resolved by checking the session of the Salesforce settings and connecting salesforce with the Zendesk.
The next steps talk about the selection of the install managed package which is responsible for installing the package in Association with the Visualforce component and the Lightning web component.
Connecting Salesforce and Zendesk The admin Centre is responsible to inculcate the integration of the 2 platforms and setting up the session that includes the location of the integration procedures. This information also includes certain recommendations and context of testing the integration with both the sandbox accounts keeping into consideration that the Salesforce sandbox account needs to be the initial designated account.
After you have successfully understood all the semantics associated with the sandbox account you need to get the connection between the two platforms by following the number of steps given below.
This initial step talks about setting up the administration Centre concerning the count of Zendesk. After the successful setting of this session, you have to click on the integration icon which is provided in the left sidebar, and proceed with the choice of selecting the Connect button which is provided to decide the Salesforce integration panel.
2. These steps are also responsible for selecting the instances in Association with Salesforce for setting up the integration between the two configurations of the cloud-based solutions.
3. These steps help us to get in touch with the window with the heading Salesforce integration set up where we can see some of the installation procedures associated with the managed package so that we can easily change the accessibility to the particular Salesforce metadata API. Here in the panel, you will also be asked to make logging procedures whenever you are getting redirected to the platform of Salesforce.
4. You have to keep in mind that whenever you are building a connection with the salesforce and the Zendesk account, you need to enforce the testing procedures for the integration of both sandbox accounts and therefore there is the requirement of disconnecting to integration platforms and then again moving ahead with the reconnection of both production accounts.
5. The next steps talk about the selection of the install managed package which is responsible for installing the package in Association with the Visualforce component and the Lightning web component.
6. You will also be asked to open the account of the Salesforce platform in the particular web browser or you can open it in the new tab for the installation process and utilize the feature known as the ticket view feature for viewing both the components been registered.
7. Now, the next step is to respond to the procedures of logging in whenever you are asked to concerning Salesforce in case you are not logged in to the account. After making the successful login to the salesforce account you have to open the private web browser for the same process so that the windows and the associated task ensure that you are activating a single Salesforce session for the same purpose. Now you will be able to address the window named as install Salesforce integration for which you have to go through the application name along with the version name and the publisher.
8. The next step is the installation of the integration platform and after you are finished with the process of installation of the package you can click on the button named as done. 9. You can finally come back to the administration center and hence, make the acceptance of the terms and conditions concerning the Zendesk account. The last option you have to choose is to connect and allow access by clicking on the allow access screen.